You will learn the main concepts to understand your fish finder’s screen. This includes the types of sonar signals. It will help you fish better and have more fun.
Related article: Best Fish Finders Under $200
Fish Finders Basic Know How
Types of fish finders
Three main types of fish finders are used: stand-alone, combo, and networked systems. Stand-alone units work better for small boats and beginners. The combo equipment has GPS and fish finding, while network setups are complex units with display, radar, and video.
Understanding frequencies of fish finders
The frequencies of fish finders vary. Frequencies of 200 kHz or 455/800 kHz are better for fishing in shallow waters and 50 or 83 kHz for deep water fishing. Others use dual, multiple, or CHIRP (Compressed High-Intensity Radiated Pulse) frequencies. They do this for better resolution.
Reading a Fishfinder
The ability to interpret a display is critical to the efficient use of a fish finder. Fish are normally depicted as arches or dots. Vegetation might be shown by a line or a cluster of lines, and the boundary could be represented by a solid black line. Differentiation between these signals must be practiced.
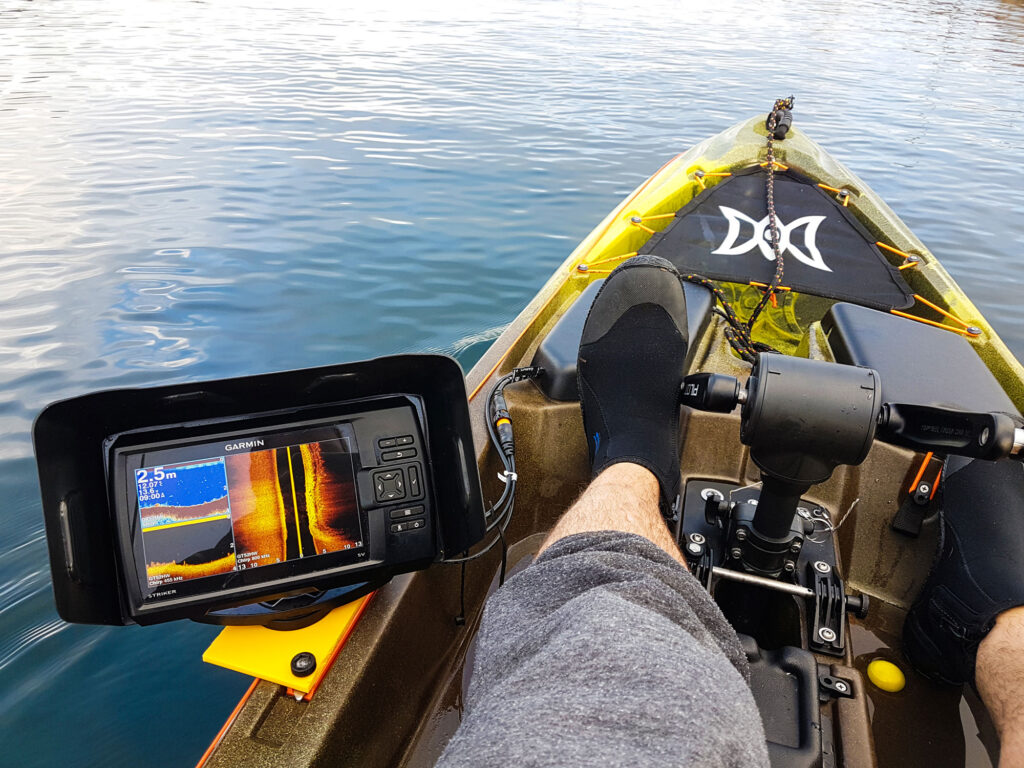
Transducer placement
The transducer that sends and receives the ultrasonic signals must fit well. Any tilt will affect its emission and sensitivity. It is most often mounted on the hull of smaller boats but on the transom of larger boats (the flat surface forming the stern of a boat).
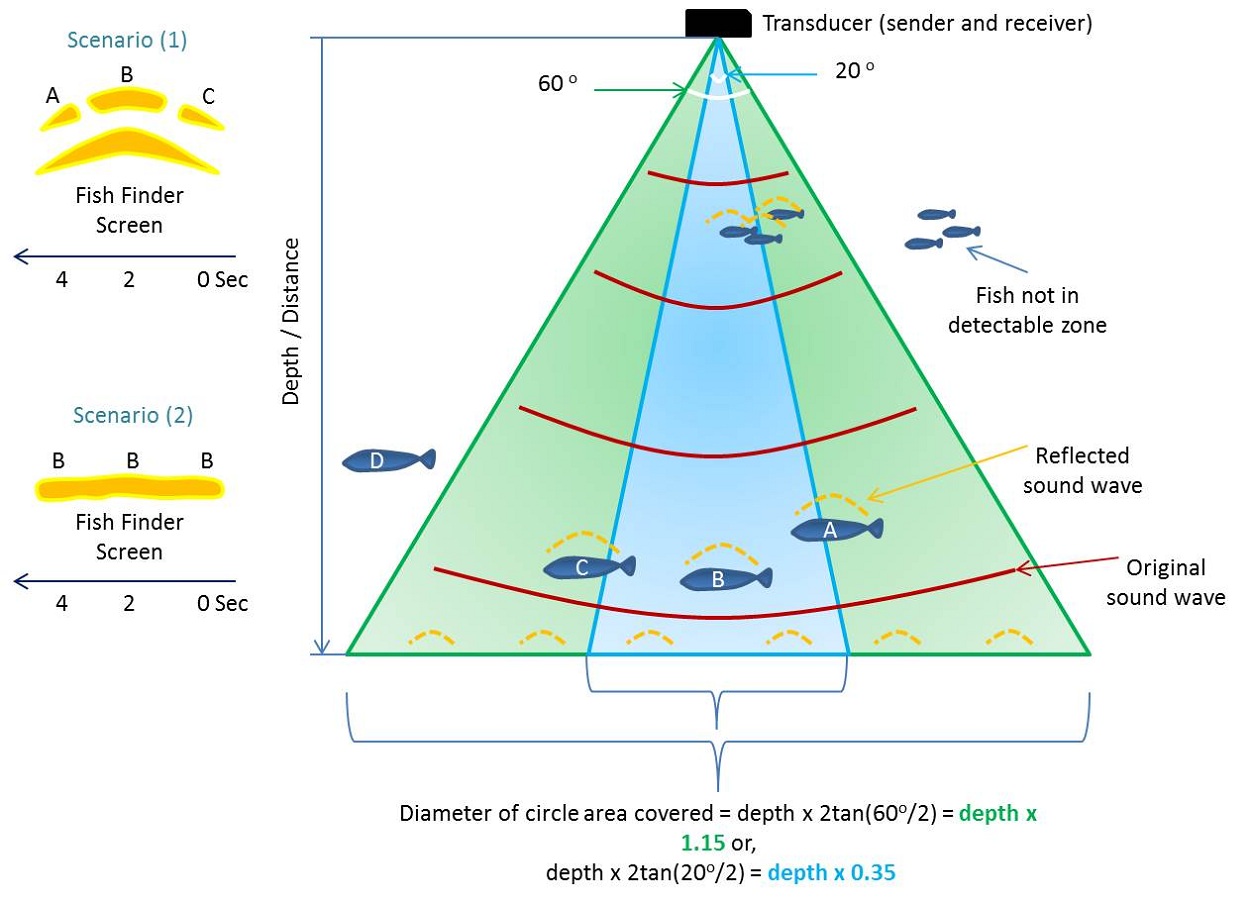
Power and cone angles
The power of a fish finder is given in wattage (W). Greater wattage equals faster readings. The cone angle is the measure of beam width in the transmitted signal. A wider cone on a catfish finder offers a large coverage area but little detail.
GPS integration
Modern fish finders are mostly equipped with GPS technology. This feature lets you mark productive fishing sites, trace trails, and sail waters easily.
How do you read a fishfinder screen?
Fish Arches vs. Fish Dots
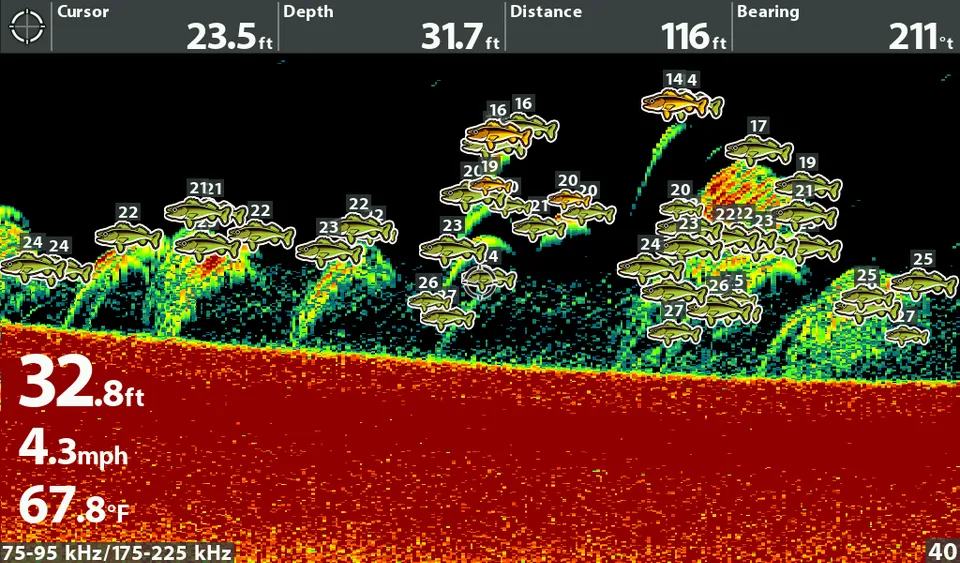
Beginners need to realize that the fish arches and dots on a fish finder screen are two different things. ‘Arching’ is the shape of a fish’s sonar pulses. The fish’s movements distort them as they move through the main beam. A solid line or cluster usually shows a stationary object, like vegetation or a structure.
Fish are presented as arches with their apex points facing the transducer. The height of the arch also tells about the height of the fish. Larger fishes usually have more prominent arches compared to smaller fishes, which appear as dots.
On the other side, dots may also stand for fish but are mostly smaller or farther away. Dots can be used to illustrate junk or other small objects in the water. In the downed image, fish will be seen as clear dots having a shadow below.
In down-looking images, fishes appear as dots. Down-imaging sonar uses a thin fan of vertical beams. So, it is tough to capture the whole object’s shape. In addition to this, it has a narrow sonar beam, which allows it to detect small objects like fish. However, a down-looking sonar does not yield a more accurate depth of fish than a side-looking one.
Knowing the difference between arch and dots lets you better interpret a fish finder screen. By examining the size and shape of each signal, you can classify the type of fish or object in the water column.
Understanding fish icons:
Fish icons or fish ID technology is a function of some fish finders that enables the user to easily identify and separate different types of fish. This technology uses preset data to classify some fish. It uses specific sonar signals.
Although that might seem a useful feature, it has to be said that these icons are not always correct. Sometimes, they take other objects or water turbulence to be fish. It is always better to trust your knowledge of the sonar signals than to rely on the fish icons.
Also, some fish finders let you customize fish icons based on your fishing experiences. It can assist dedicated fishermen in recording and later analyzing their fishing statistics.
How do we read down imaging vs. side imaging signals?
Reading down imaging:
In down imaging, sonar beams are aimed straight down. High frequencies give a clear view of the underwater terrain and objects just below your boat. This kind of imaging offers a more accurate image than the conventional 2D sonar.
While reading down the imaging signals, look for well-defined and clear shapes such as arches or dots. These may show the presence of fish or other things in the water column. It’s good to remember, though, that down imaging may make it hard to detect fish among other objects. You could use the fish ID system or your knowledge to verify the presence of fish.
Reading side imaging:
Side imaging has two sonar cones on the boat’s sides. They point outward, giving a wider view of the underwater area. This kind of imaging is designed for surveying larger regions and finding possible fishing areas.
With the side imaging signals, look for long and thin shapes or shadows on either side of the boat. These can show the existence of fish or anything like rocks or logs. Side scanning imaging can identify changes in water depth and the bottom contour. These changes affect where fish are located.
Tips for reading fish finder signals:
Spend time learning and comprehending the various sonar technologies and how they operate.
Observe how strong the signal is – a stronger signal implies more accurate readings.
Practice recognizing signals by comparing them with known underwater objects.
Utilize the zoom function to see the details of specific regions and signals.
Merge different technologies and elements to get a more detailed picture of the marine world.
Note that fish behavior plays a role. So, use multiple techniques, like observation or other sonar, to confirm the readings.
How do you estimate fish size using a fish finder?
Estimation of fish size by a fish finder involves examination of the arches that appear on the screen, standing for fish. The thickness and length of these arches indicate the size of the fish as well.
A wider, longer arch typically implies a larger fish, whereas a narrower, shorter arch commonly means a smaller one. Also, strong signals can mean the fish are dense. This usually means they’re larger.
For better estimates, use fish finders with updated features. They should have high frequency and CHIRP technology. They give higher resolution; therefore, it is simpler to classify between the sizes of fish that are closely massed.
With experience, you’ll get better at estimating fish sizes with a fish finder. You can enhance your skills at assessing the size of fish by routinely using a fish finder and mastering its signals.
Also, note that depth, water clarity, and bottom type can affect sonar images of fish. All these parameters should be taken into account when estimating fish size with a fish finder.
How to read underwater topography on your finder?
You need to learn how to use the depth finder feature on your fish finder to read the underwater topography with accuracy. You can find fish and plan your fishing strategy by studying the underwater contours and structures.
Start with setting the depth range on the fish finder to a level that shows the bottom and any possible structures or drop-offs.
Check for changes in depth, like unexpected rises or drops. They may show spots where fish are grouped.
Be attentive to any types of structures like rocks, logs, or submerged vegetation, which might be a shelter and a source of food for fish.
Use side imaging or CHIRP tech to find fish. It helps you see the underwater topography and any hiding spots.
With more practice reading underwater maps, try different fish finder settings. This will help you get the best results in different places.
How to read an ice fishing flasher?
The secret of catching fish while ice fishing lies in learning to read icefish sounders. The flasher displays sonar returns with depth shown circularly on the vertical axis. When using an ice fishing flasher:
Identify the bottom: The flasher will show the lake or river bottom as a solid, thick line across the screen. This is your depth reference point.
Look for fish signals: Fish will appear as lines or marks between the surface and the bottom. The thickness and location of these marks offer unique insights into the size of the fish and their actual depth.
Monitor your lure or jig: Put your line into the water and watch the appearance of the lure on the flasher. After that, you may wiggle the jig to startle the fish and observe their reactions to the lure.
Watch for movement. If lively marks appear, fish will swim toward your jig. Experiment with a jigging technique to attract a strike.
How to read a Garmin fish finder?
Garmin is one of the most reliable brands concerning fish finders. You’ll spot a mixture of maps, sonar scans, and other information on the screen.
On the right-hand side, you will see the sonar display: This shows the depths of objects and fishes in the submerged section. The closer an object is to your boat, the higher on the screen it will appear.
On the left-hand side, you will see the map display of this bass finder. This enables you to see your position and drop any points of interest, such as where you caught a fish or where fish were detected. On Cabela Garmin fish finders, you can also make use of this functionality for traveling to different spots on the lake.
How to read a Lowrance fish finder?
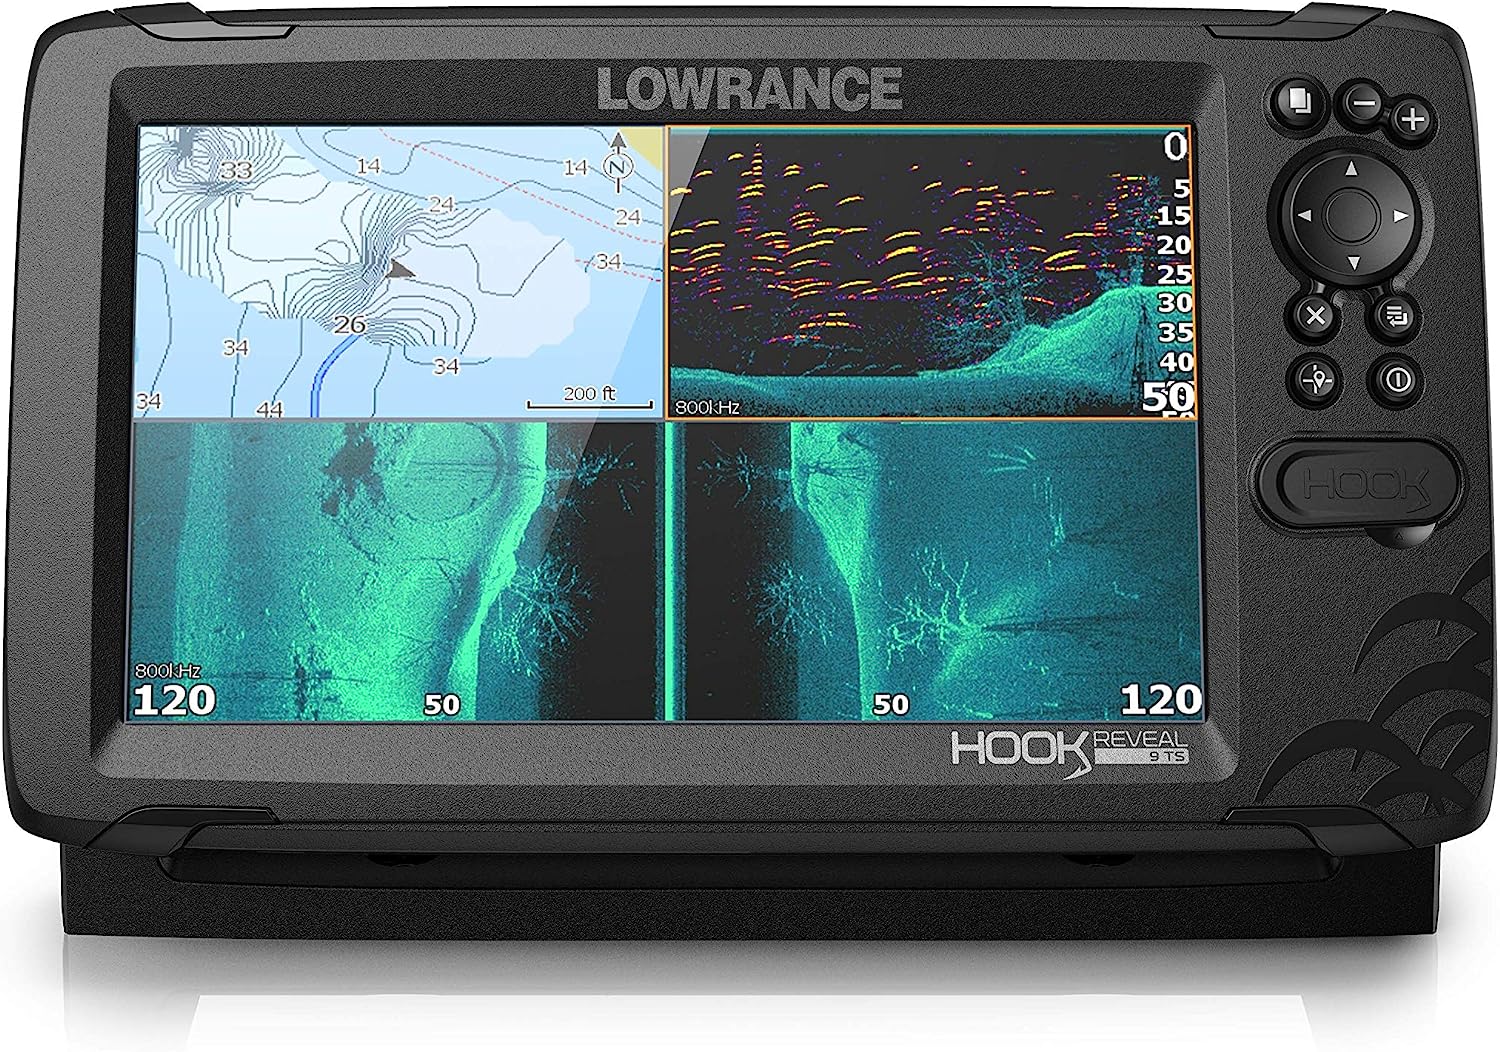
Amazon link of Lowrance Hook Reveal 9-inch Fishfinders with Preloaded C-MAP Options
Lowrance is another well-known brand of fish detectors. The design of Lowrance fish finder’s screens is quite similar to Garmin’s, but the features may vary.
Sonar chart: This graph shows the underwater environment in real time. It uses sonar sensor readings. You can see fish, structures, and other items underneath you.
Fish arches: Unlike Garmin’s fish alarms, Lowrance fish locators use fish arches to represent fish. The sizes and shapes of the arches are the main indicators of the fish’s size and their depths at the moment.
How to read a Humminbird fish finder?
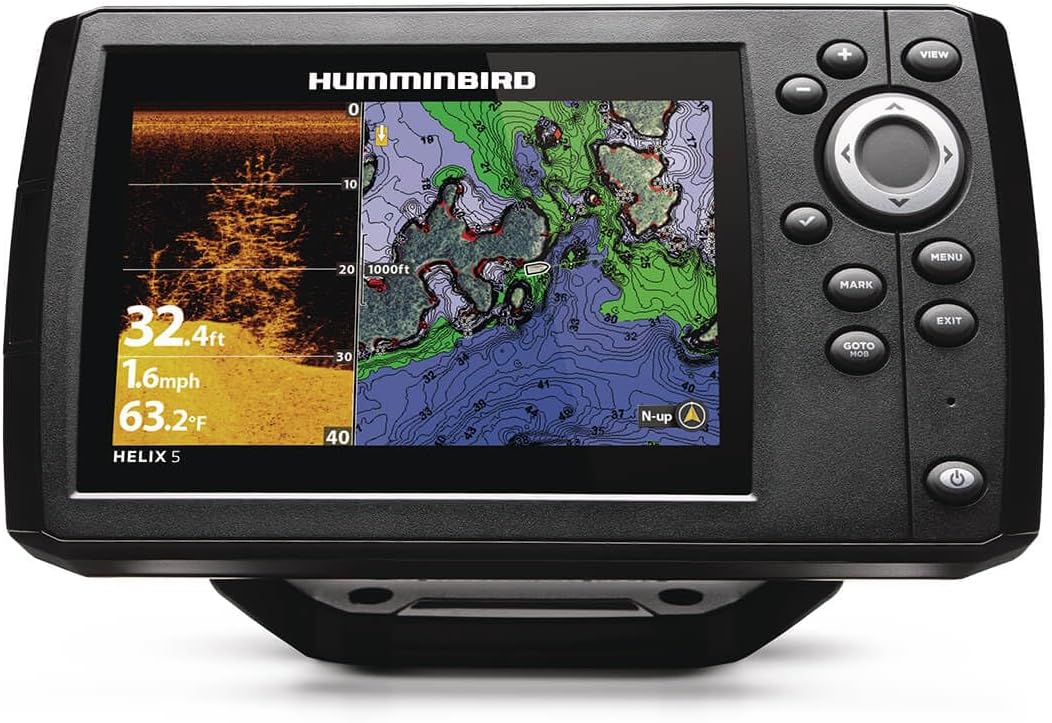
Some of the features, that make Humminbird fish finders the best in the market, are some of the top-notch functions. Here’s how to read their display:
Side imaging: It allows you to see more of the bottom of the sea and the objects on both sides of the boat. This is done by employing the sonar beams that offer a complete image of the bottom, and any structures or fish around it.
Down imaging: Like with side imaging, down imaging helps you get a clear picture of what is directly below your vessel. This is useful in fishing since it helps in identifying the fishing hiding from your view under structures.
SwitchFire: This feature lets you choose between sonar views. Use clear mode to see fish and structures. Use Max mode to see more details in the water column.
Wrapping up!
Fish finder displays have changed fishing. But, an aspiring fisherman must read the show. It’s very critical. It may take time to learn the machine and its display. However, the fishing procedure will speed up in identifying the fish. As you move, change locations. Remember to update your settings. Also, watch for when settings are needed and any changes around you. Through these tips and strategies, you will find it much easier to read fish finders as an expert.